Step by step guide to setting up a bbPress forum – part 2
WHERE ARE WE?
Part 1 dealt with getting the forum going.
Part 2 deals briefly with plugins, but mainly with changes to styling and bbPress.css
Part 3 will dealt with layout and functionality.
The forum is now fully functional, but probably you’ll want to change some of how it looks. If you’re using anything but a default theme, I expect that the colors won’t look right, and you may want to change some fonts.
You may also want to change where elements are displayed. Or add other functions to your site.
So there are two types of change we might want to make to our site –
- changes in style – how it looks, and
- changes in functionality – how it works.
Changing bbPress to achieve both these can consist of 4 things:
1. Changing CSS
2. Adding Plugins
3. Changing function files
4. Changing PHP files
This part 2 deals with changes in style which means primarily changing css.
Summary for techies
If you’re already into css, then bbpress uses by default a file called bbpress.css located in wp-content/plugins/bbpress/templates/default/css
Either just override styling in your theme’s css, or copy the bbpress.css file to a folder
/wp-content/themes/%your-theme%/css/
and bbpress will use that file, so make changes there.
A quick bbpress styling crib is available to get you started.
1. What is css?
CSS stands for Cascade Style Sheet – it’s a simple way to define elements of the site that will be used often. For instance if parts of your website have a heading, then defining a heading style once (font size, color, font used, bold, italic etc.), and then simply referring to it each time a heading is displayed is much easier than defining it each time.
Now we can override the default CSS elements in 4 ways
- With a css plugin
- Adding code to our child theme’s style.css
- Copying/creating a bbpress stylesheet in your child theme
- With functions (see below)
2. Using a CSS plugin
There are several around, including https://wordpress.org/plugins/simple-custom-css/ just google ‘WordPress css plugin’ to find one right for you.
Using these you can add css to your site without needing to code in files, and if you’re only doing a few small changes, this can be an easy way without fearing that you’ll ruin a file on your website.
However if you doing all but a few small changes, you would be better looking at the remaining options
So in this section we’ll deal with b & c.
But before we do that, we need to understand a bit more about how to change files without losing our work later on.
3. Changing files Overview – get a child theme !
To make bbPress work or look better without plugins, we’ll need to change files.
Now if we simply change the files in bbPress, then any updates to bbPress will risk losing these changes, and undoing all your hard work.
So we will make changes in our WordPress themes, leaving alone the bbpress plugin directory.
If you’re in to writing your own WordPress themes, then I suspect you’ll be skim reading this article, so the next bit is for those of you that are either using a WordPress default (twentyten, twentyeleven etc.) or have chosen one of the many free or paid for themes.
If you have gone for any of the above, then again if you simply make changes to the theme, then any updates to your theme will risk losing these changes, and again undoing all your hard work.
If you are a bit more advanced, you may already have a child theme, and it is here that we’ll make additions and changes. That way updates will not affect lose the changes we have carefully crafted.
If you don’t currently have a WordPress child theme, then the best way to proceed is to create one, and then you can make changes there.
If you don’t know how to create one, the WordPress Child Theme training module is a great place to start, also search google “child theme wordpress video” and you’ll find lots of demonstrations. If someone has built a site for you, it may already be a in a child theme, and again the video’s will let you see whether this is the case.
So let’s presume you now have a child theme…
bbPress picks on the styles used in your theme for some elements, but uses its own CSS style sheet for others. This default css works well with the wordpress twentyten theme, but may not look right with your theme.
4. Adding code to our child theme’s style.css
If you’re making just a few changes, then adding the code to your child theme’s style.css is the easiest way to go
We’ll come later to the key bits of code you might want to change, but for the moment let’s suppose that you don’t like the way bbPress lists the forums.
The default looks like :
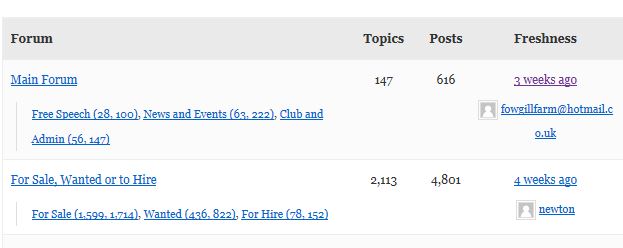
And you’d like it to look like :
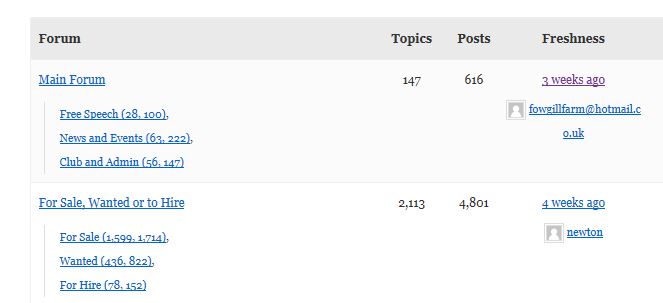
This element is styled in the original bbPress.css file as followed
#bbpress-forums .bbp-forums-list li {
display: inline ;
font-size: 11px;
}
Changing the ‘display:inline’ to ‘display:list-item’ will achieve this. But as we said above, whilst you could simply amend line 121 (in wp-content/plugins/bbpress/templates/default/css/bbpress.css) you don’t want to alter this, as upgrades to bbPress versions might well overwrite this.
So we simply enter the appropriate code in our child theme’s style.css.
We can enter the entire “chunk” of code, and if you’re copying from bbpress.css, then copying the entire chunk and then altering just the bits you want will help you remember what other parameters are there
So
#bbpress-forums .bbp-forums-list li {
display: list-item !important;
font-size: 11px;
}
achieves this. Equally well you could post
#bbpress-forums .bbp-forums-list li {
display: list-item !important;
}
ie just the bits of the code that you actually want to change.
NOW you may have spotted that I’ve added ‘!important’ to the line. This is because our theme style.css file will execute first, then the bbpress.css (being a plugin) will execute afterwards. Since the later bbpress.css file contains the original code, this will simply overwrite the changes you have made. By entering ‘!important’ to the line, you tell WordPress not to allow this code to be overwritten by later code, so preserving your change.
So that’s method 1, using your child theme’s style.css.
5. Copying/creating a bbpress stylesheet in your child theme
The alternative method is to either take a copy of bbpress’ default css or create a brand new one, and put this in a specific area of your theme that bbpress looks for.
For .css files, bbpress looks at you theme files in the following location :
/wp-content/themes/%your-theme%/css/
where %your-theme% is the actual directory name of your theme.
So any .css file found in this location will be used. I am not sure if this is instead of the bbpress.css file in the plugin default location or in addition to it. You will need to check that yourself, as at the time of writing I have not!
So your best bet is to copy the bbpress.css from wp-content/plugins/bbpress/templates/default/css/bbpress.css
To a directory called css as above in your theme directory.
You can then edit this theme to your heart’s content, knowing that it won’t be overwritten by any bbpress upgrades.
So if you’re now ready to start changing code but what can you change?
See bbPress styling crib to get you started.
6. Changing colors
For people starting out with css, knowing what exact color something is can be tricky. So if your main theme has a background of a light blue – how do you get that exact same shade in bbpress.
More technical people will use features within browsers to show them the underlying information. For instance many people use a product called “firebug” with a Firefox browser to show them exactly what is happening, including what exact colours are being used for text and backgrounds. These tools can be extremely useful as you progress, and it’s worth getting to know them if you plan more than a couple of changes. Google “firebug video” to get lots of help such as Firebug tutorial
An alternative if colors are what you’re after is to use a product like colorcop which will let you see exactly what color is being used on any part of your screen, so copying either your own theme’s colors or someone else’s is really easy.
The next section deals with changing layout and functionality part 3